I tripled my income with data science. Here’s how.
Over a year ago, I lost my job to the Covid-19 pandemic. It turned out to be a blessing in disguise.
Natassha SelvarajJul 2·5 min read

Just over a year go, I was working part time as a private tutor while studying.
I was earning only slightly more than minimum wage during this time, just enough to cover expenses like food and petrol.
I lost my job during the pandemic, and was told that I could only go back to teaching once the nationwide lockdown was lifted.
After this happened, I suddenly realized I had a lot of free time. I didn’t have to attend classes at university any longer. I also no longer had a job.
I took this opportunity to teach myself data science.
In just over a year, I managed to triple my salary by creating multiple streams of income with my data science knowledge.
Here’s how:
1. Data science job
I managed to land a data science internship which then turned into a full time job offer.
There are two advantages of taking a full time data science job:
Although this isn’t where a huge portion of my income comes from, its consistent, which I like.
I learn something new everyday. I work on my communication skills when talking to people in different teams, build and scale machine learning models to large datasets, and come up with different techniques to improve customer journey.
The best part about this job is that unlike freelancing, I don’t get to choose the projects I work on.
This means that even if I don’t know how to do something, I have no choice but to learn within a day or two or get it done.
The task almost always gets done, and I walk away having learnt something new.
Also, as an introvert, I used to find it difficult to communicate with people and present during team meetings.
I didn’t really have a choice once taking on a role as a data scientist, because a lot of my work involves presenting model insights and gathering business requirements from the client.
Due to this, my communication skills have improved dramatically over the past year.
2. Data science blogging
During my free time (usually at night or during weekends),write for data science
I started out with writing articles around projects I built, in order to strengthen my portfolio.
I enjoyed creating, and my articles were a way of sharing my journey with others. I didn’t know anyone else at that time to study with, and nobody I knew shared the same interest as me in data science.
I wrote so I could document my progress, and connect with a community of like-minded people who shared the same goals as me.
Over time, I realized that my articles added value for people who were on the same journey as I was.
As I wrote more, what had initially started out as a hobby began to generate revenue.
I was able to make passive income by simply writing about my experiences and posting them online.
I am now a top writer in technology and artificial intelligence on Medium, which is more than anything I could’ve imagined.
3. Affiliate marketing
Once I started learning data science on my own, I would share links to the courses I was taking on Medium and LinkedIn.
However, it is only recently that I discovered affiliate marketing.
With affiliate marketing, you can share courses that you enjoyed with other people. If someone else clicks on the course link you shared, a small percentage of their course fee will go to you.
I am yet to earn a lot from affiliate marketing, mainly because I am very selective about the courses I promote.
I have taken almost all the courses I promote, and have done extensive research to compile the rest.
So this is a very small income stream, but I’m still adding it to this list.
4. Freelancing
Last year, I was looking for ways to make money online.
I surveyed sites like Fiverr and Upwork to see if I’d be able to take up any gigs, since I really needed a new source of income.
However, I felt like these platforms were overly competitive, and I didn’t really fit into any of the categories on these sites.
After learning data science, I realized that there was a pretty big market for freelance data scientists.
There are many companies out there that don’t require an entire data science team, and hire people on a contract basis to build and deploy models for them.
I’m currently working on a one-off machine learning project for a client, and I’m learning a lot along the way.
I also get freelance offers from publishers and technical sites to write data science articles for them.
All my clients have reached out to me after reading my articles or my LinkedIn posts, which is why its a great idea to write data science articles on Medium and build a social media following.
Conclusion
Losing my tutoring job due to the Covid-19 pandemic was one of the best things that happened to me.
I realized that I was stuck for a very long time with little idea of what to do in the future, and losing my job gave me some free time to introspect, learn, and decide what I really wanted to do.
Of course, I was lucky enough to have the opportunity to survive without a job for so long and actually learn the skills necessary to become a data scientist.
Upskilling and learning how to code was one of the best decisions I’ve ever made.
5 Great Features in BigQuery’s New UI for 2021 (yes, it has tabs!)

Image licensed to author
This week marked an exciting week for users of Google BigQuery; a much-anticipated UI update was made available in public preview.
Having used the new UI in anger for the past week, I thought I’d share my top 10 likes on the new look.
Readers should note that the new UI is in preview, and therefore likely to further improve before being officially released to (most likely) beta.
So, in no particular order, let’s begin.
#1 new layout, new panels
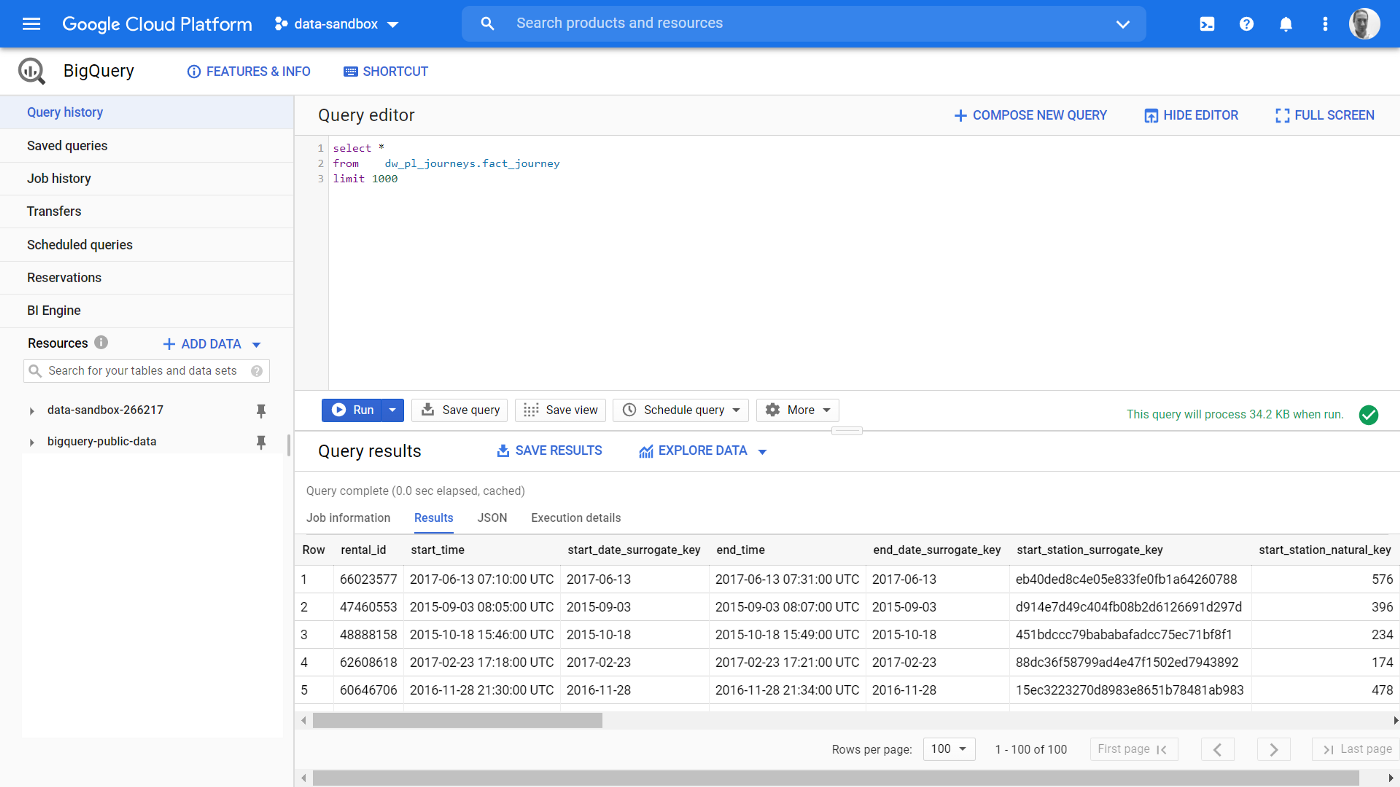
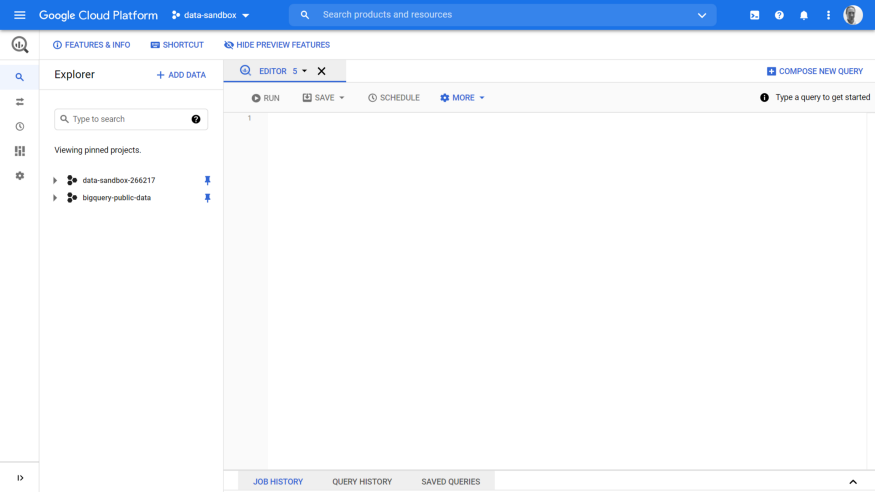
So as a reminder, here’s what the previous UI looked like; here I have run a simple query against a copy I made of the London Cycle Hire Scheme (a public dataset available from Google). We have a single menu pane on the left, and a horizontally split pane on the right, to run our SQL queries.
When you first launch the new UI, this is how it looks. As you can see, quite a bit has changed!
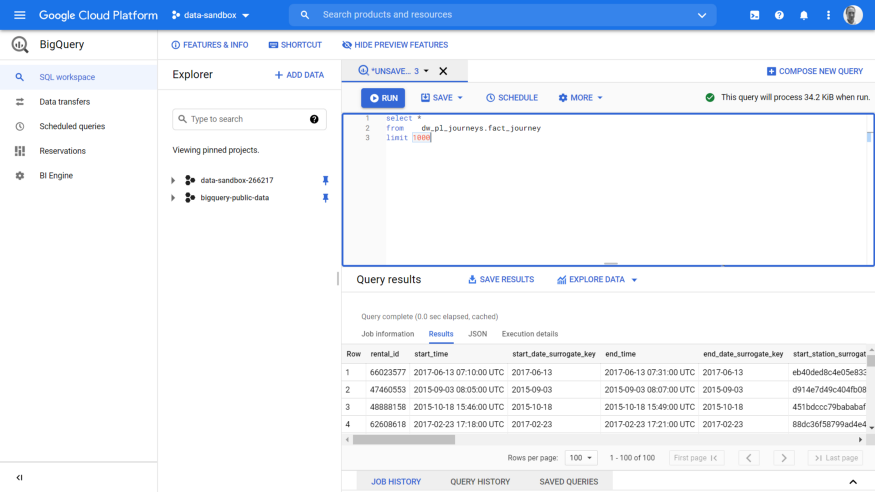
New navigation menu
The first thing I like is the new vertical panel on the left — this is officially labelled as the “BigQuery navigation menu”, and contains the following options:
SQL workspace (new)
This brings you back to this main screen where you can execute SQL queries. This is super helpful and means you can always easily return to this page should you click on one of the other services from this menu.
Data transfers (Transfers in the old left panel)
As before, this takes you to the BigQuery Data Transfer Service (DTS). No changes to the DTS screen, which apart from the back arrow removed (you now click on the above SQL workspace menu item), is identical.
Tip: the new UI prompts you to save your changes, if you have not already done so. The old UI, remembered your SQL query when you returned back from the DTS panel — in the new UI, your SQL is lost. So make sure to either save, or retrieve your query from the Query History option.
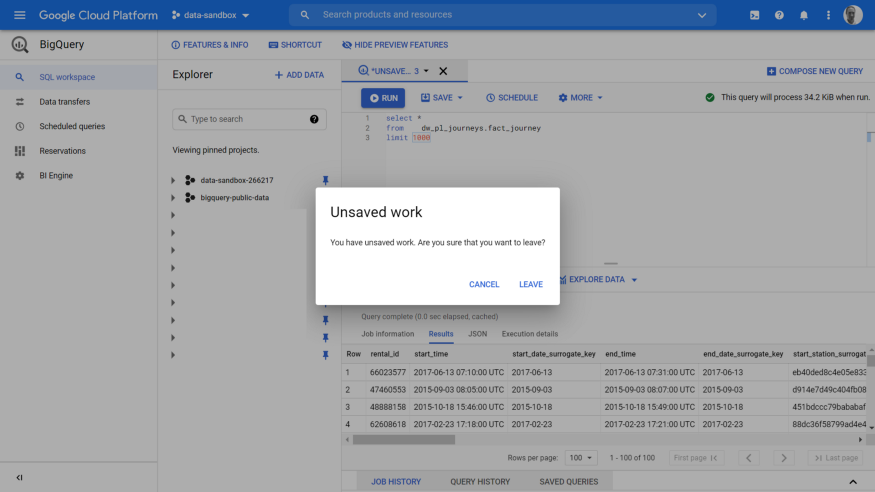
Clicking a link in the new left menu pane, prompts to save your work
Scheduled queries (Scheduled queries in the old left panel, no change)
Reservations (Reservations in the old left panel, no change)
BI Engine (BI Engine in the old left panel, no change)
New controls to hide panels
One thing I did note with this new vertical navigation panel, is it takes up quite a bit of screen real estate and can leave your SQL panel a bit squeezed, especially when on a laptop.
The good news — there are some new expand/collapse controls to hide this menu (I tend to work in this mode). These are at the bottom of the nav pane, shown here:
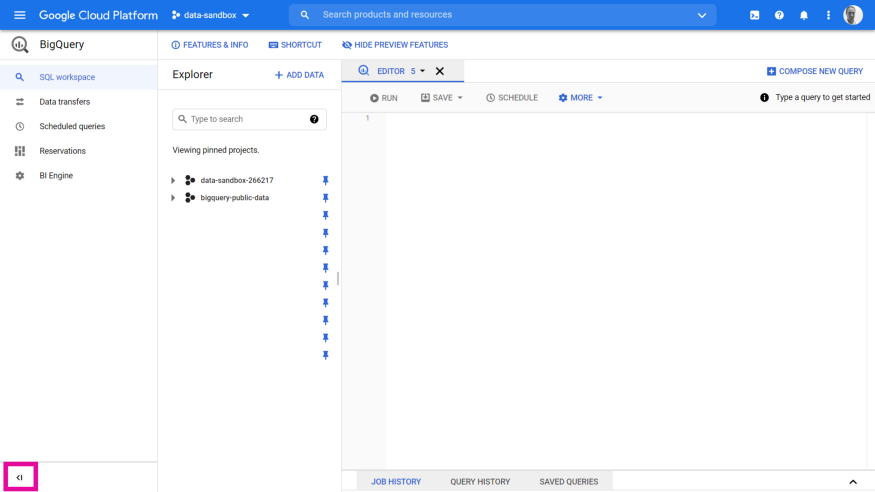
I tend to work with this menu collapsed, and think most people will do the same:
I tend to work with the new navigation pane hidden
One thing that’s a little strange, there isn’t a similar control at the bottom of the Explorer pane; if you want to hide this, you have to resize manually, as before.
#2 tabbed SQL panes are here!
It’s great to see these in the new release — this is something that a lot of seasoned database developers will be used to. For example, MS SQLServer Management Server supports tabbed query panes, and also so do some rival modern Cloud data warehouses, notably Snowflake.
In the new UI, there a number of ways to add new tabs:
- Click on the COMPOSE NEW QUERY button
- From the Query History pane, select a query, and click Open query in editor. This is great to see, as I used to find it a bit annoying that this would overwrite your SQL when there was just one pane. Well done Google!
- From the Saved queries pane, click Open query in editor. Again, great to see this doesn’t overwrite your current SQL window.
- In the Explorer pane, click on a table or view name, and this opens the definition in a new tab. This is quite a change, if you recall in the current UI, this opens the table definition in the panel below the SQL query (replacing any results).
I’m personally not sure I like this last new behaviour — if you want to quickly explore a few tables in a dataset, this can quickly lead to lots of tabs being opened. Another feature that I used to use a lot, which now appears to have gone (for now), is you used to be able to click on the column names in the details pane, and it would add that column to your SQL window. I think I need to get used to using the new and improved IntelliSense…
#3 new IntelliSense revamp!
Once in the new SQL pane, one of the first things to note is the much improved Intellisense. This is now really good and makes writing SQL a lot quicker, especially if you are not too familiar with the table structures.
Here are a few examples.
Finding Datasets and Tables
So, I want to select from my dataset dw_pl_journeys. I just have to start typing the name of the dataset, and in realtime, I see datasets (and databases) that match. Pressing tab completes the dataset:
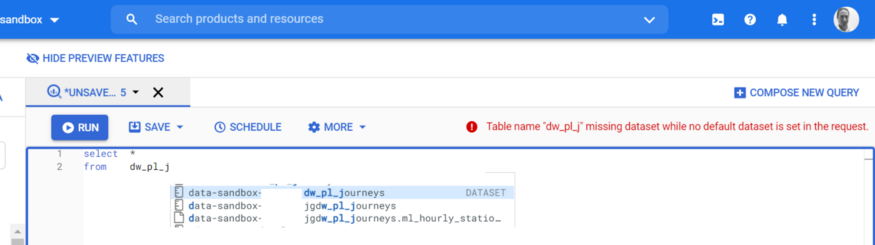
BigQuery can also search for the table name — so in the above example, if I type:
select * from fact_journey I see all tables that match this, across datasets I can access.
Keywords (including functions!)
BigQuery now supports auto-completion of all keywords-I found this really helpful, in fact, one of my favourite changes.
For example, I can now easily see the date functions by just typing select date_
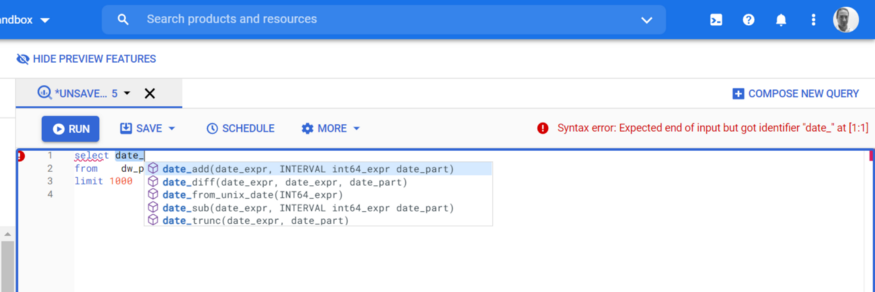
I love this new feature — saves time if you’re not sure of the date function you need
Tip: to force intellisense to be displayed, as before, use the ctrl+space hotkey
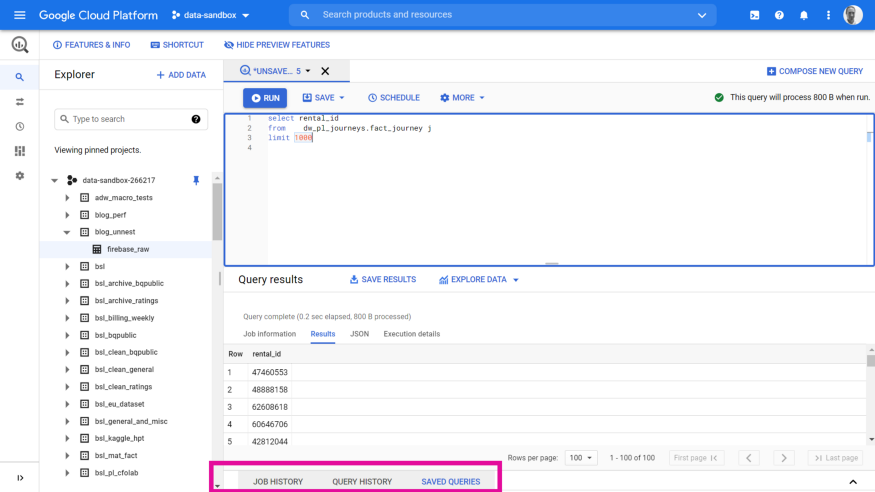
#4 New footer navigation menu
A new footer menu has been introduced, highlighted below. This contains JOB HISTORY, QUERY HISTORY and SAVED QUERIES. These have been moved from the left nav menu.
#5 Split panes to view SQL results side-by-side
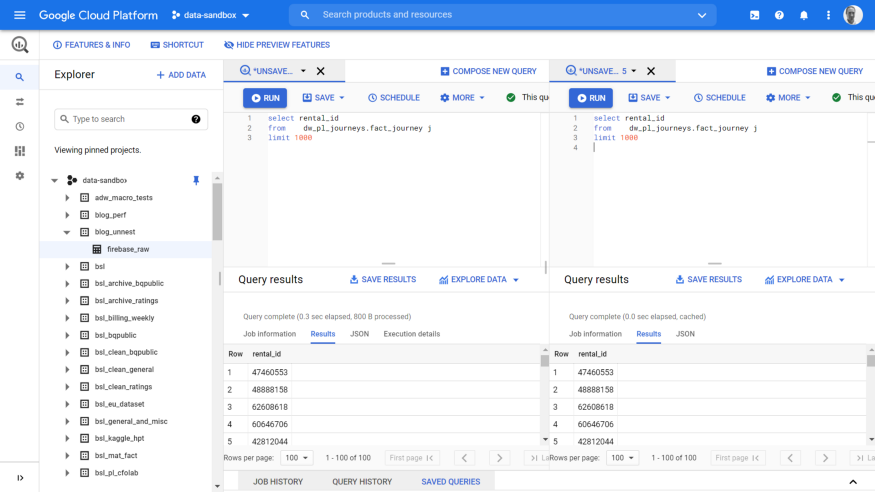
Last, but by no means least, the new UI has the ability to show tabs side-by-side. This is really useful when you want to compare results from two queries and say, you are on a laptop so don’t have the luxury of two monitors.
Let’s say I want to view these two tabs side-by-side:
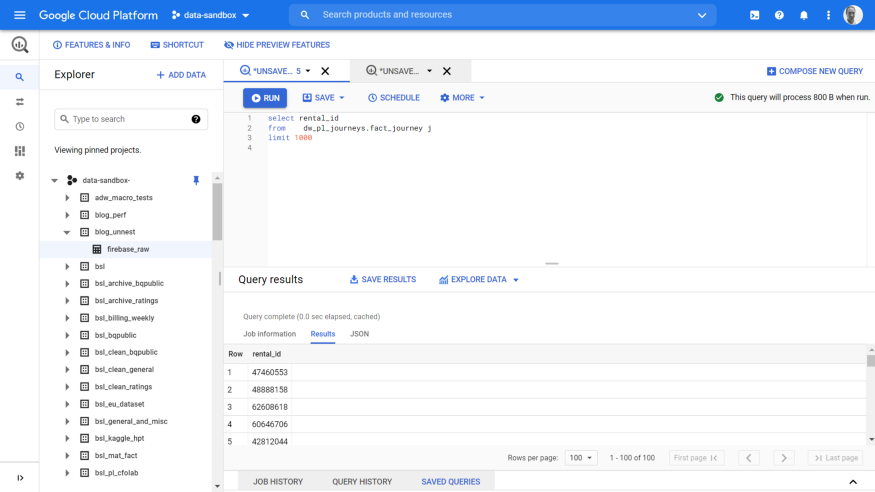
First, select the drop-down on the right-hand tab and select Split tab to right:
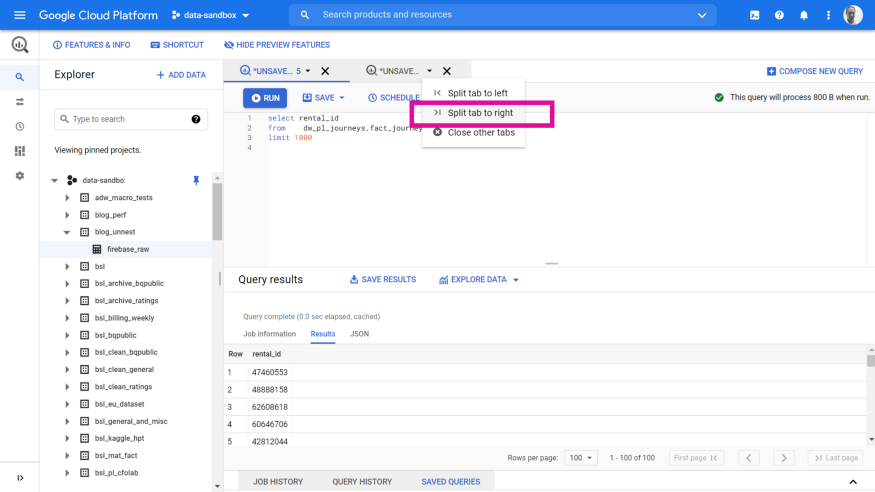
This places tab2 next to tab 1, and I can now run and compare results — super helpful!
Conclusions
Having used the new UI in anger for the past few days, I thought it would be helpful to share my experience with fellow data scientists and data professionals alike.
In summary, I really like what has been done in this release, despite it being only in preview. In particular, the new tabs are a much-welcomed addition, and the new IntelliSense that can list functions has already saved my time cross-referencing external documentation to remember a function name, or which parameters to pass.
A few things I’m not too sure about — notably the table details appearing in a new tab is a little odd, and in my opinion, I prefer it when it opened below the SQL pane.
I’d love to hear what you think about the new changes, please feel free to comment, and happing SQL wrangling in 2021!
HOW TO USE POWER BI ON MAC DEVICE (FROM MEDIUM)
Power BI is a powerful BI tool, yet doesn’t support Mac devices, sadly.

I was working for a company where 90% of our staff had a MacBook and love it, there was no way for our Data Team to work with Power BI to build out reporting.
In this post, I will share with you my experience trying to implement Power BI on Mac devices, hope this would be helpful for you if you are looking for a solution.
Our Recommended Solutions
Since Power BI can’t run on a Mac device, here are our recommendations to run Power BI on Macintosh Devices
- Install and run Power BI on a Virtual Machine, then remote to that Virtual Machine
- Install and run Power BI on a PC, then remote to that PC
- Use another alternative BI solution
Power BI’s plan on Mac Devices
To give you a little context about Microsoft’s plan on supporting Power BI on Mac devices, they are not considering developing Power BI desktop for Mac devices anytime soon.
You can also visit this link to keep track on their plan.
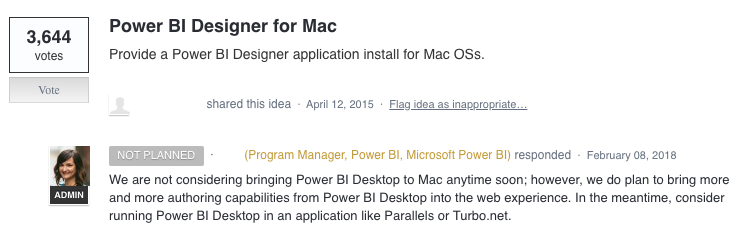
Microsoft’s response on Power BI for Mac
1. Run Power BI on a Virtual Machine
You can set-up a Windows Virtual Machine on Azure, Google Cloud or AWS
- Azure: https://azure.microsoft.com/en-us/services/virtual-machines/ (starting from $61/month)
- AWS: https://aws.amazon.com/getting-started/tutorials/launch-windows-vm/
Then you install and run Power BI on that Virtual Machine.
Finally, install Microsoft Remote Desktop for Mac on each device to let your team access to that Machine.
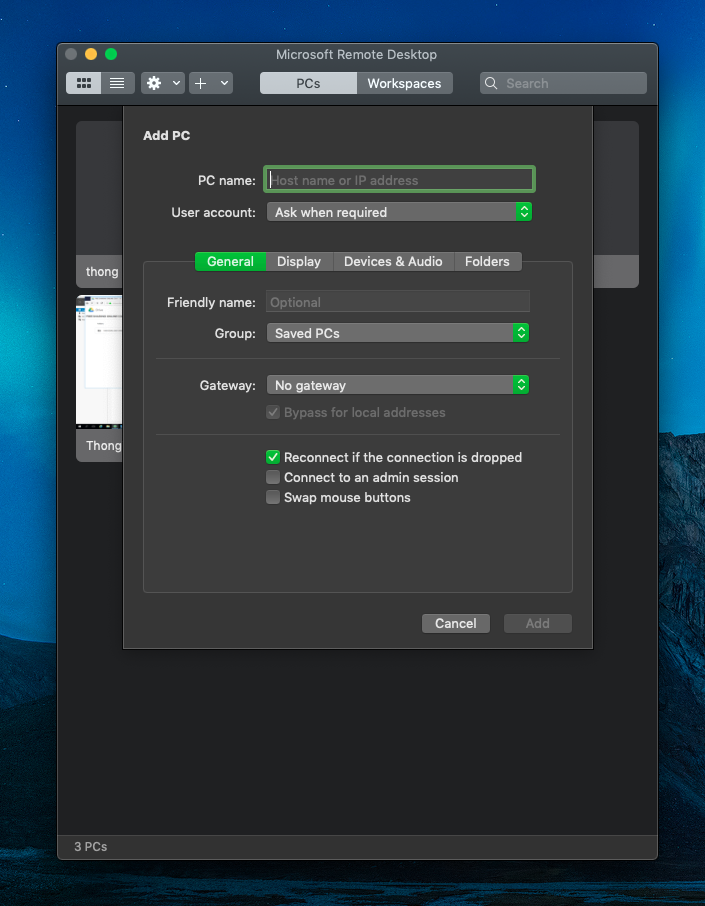
Power BI for Mac — Microsoft Remote Desktop
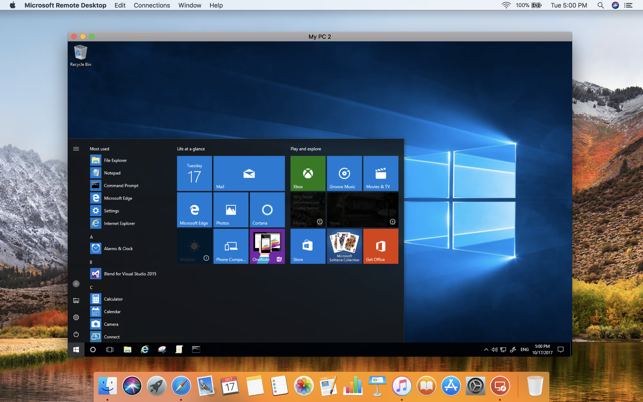
Power BI for Mac — Microsoft Remote Desktop
Cons
- It’s hard to control permission access and version history
- Still, only one person working on a machine at a time, since Power BI for desktop is not a collaborative tool
2. Run Power BI on a PC then remote to that PC
It’s a little bit the same with the first method, however, this time, you use a physical machine.
You set-up a Windows PC, install and run Power BI on that PC
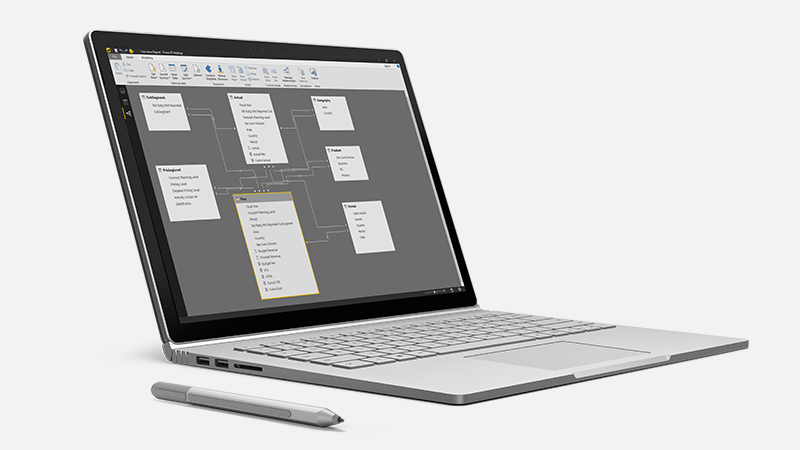
Power BI for Mac — Power BI on a Surface Book
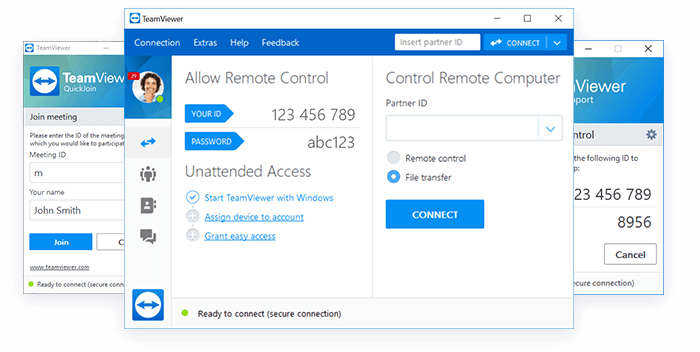
Install TeamViewer, AnyDesk, or MS Remote Desktop to let people access to that PC and use Power BI from their Mac devices
Cons: same with the 1st method and you have to maintain a physical PC
SCALA FOR APACHE SPARK PROGRAMMING

GOOGLE DATA STUDIO
Why Your Python Version (or other apps) Don’t Work on the Apple MacBook M1 (From Medium)
Hold on, don’t regret your purchase just yet!
Apple MacBooks are amazing. They have offered consistent performance & efficiency over the last couple of years making them the preferred choice for developers (although they’re a bit 💰 expensive 💰 than other choices out there). This article won’t dive into the comparison between different options out there, but if you bought the new Apple MacBook with the M1 chip, you might want to read through.
I got an Apple MacBook Pro with the new M1 chip yesterday, and I immediately ran into a problem setting it up for my development projects. One of my projects uses Python 3.6 & since it a deployed project, changing the Python version just so that it is compatible with my swanky new companion would be a recipe for disaster 💥!
Before we get to the workaround of this, let’s understand the new M1 chip in a bit more detail.
What is the new M1 Chip & what makes it different?
The Apple Silicon M1 Chip is the company’s first System-on-Chip (SoC) and the first in the family of Apple Silicon chips based on ARM.
The M1 is an 8-core, 5 nanometer processor with unified memory architecture. This allows faster performance on Mac computers using M1 versus separate CPU, GPU, RAM, and other components. M1 also claims better power efficiency with higher performance during usage. Also, the chip will allow iPhone and iPad apps to run on the Mac for the first time.
Till now, you may have used Intel-based Macs or laptops which are based on the x86_64 architecture. This means all the apps or software you may be used to were written using instructions written for these Intel or AMD (x86_64) processors.
But with the M1 chip, things changed. The processor can no longer understand the x86_64 instructions and hence, some of your programs may not work with the M1.
Although it is important to note that more and more apps are being made compatible with the new M1 chips on the block.
You can now run Python on the Apple MacBook with M1 Chip
Python 3.9.1 becomes the first version of the language to support macOS 11 Big Sur, and in turn supporting the M1-powered MacBooks.
I know exactly what you’re thinking:
But wait, Python 3.9.1 is fairly new, and my app may break if I upgrade. Does that mean my new MacBook is no good?
Absolutely not.
Hello, Rosetta 2!
Rosetta 2 is an emulator designed to bridge the transition between Intel and Apple processors. In simple words, it translates apps built for Intel so they will run on Apple Silicon.
Yay! So my old apps & any future apps that I may build will work the new chips anyway? Hold your horses, mate. Here’s what Apple has to say about Rosetta:
Rosetta is meant to ease the transition to Apple silicon, giving you time to create a universal binary for your app. It is not a substitute for creating a native version of your app.
So, what does Rosetta do exactly? According to Apple,
If an executable contains only Intel instructions, macOS automatically launches Rosetta and begins the translation process. When translation finishes, the system launches the translated executable in place of the original. However, the translation process takes time, so users might perceive that translated apps launch or run more slowly at times.
More about the Rosetta Translation Environment here.
You can install the Rosetta environment by running the following command:
softwareupdate —-install-rosetta
It would be wise to mention that you can run your entire Terminal under Rosetta, although I’m not sure if it’s advisable to do so.
Go to Finder > Applications > Utilities > Right click the terminal app and select ‘Get Info’. Check the box that says ‘Open using Rosetta’ and close.
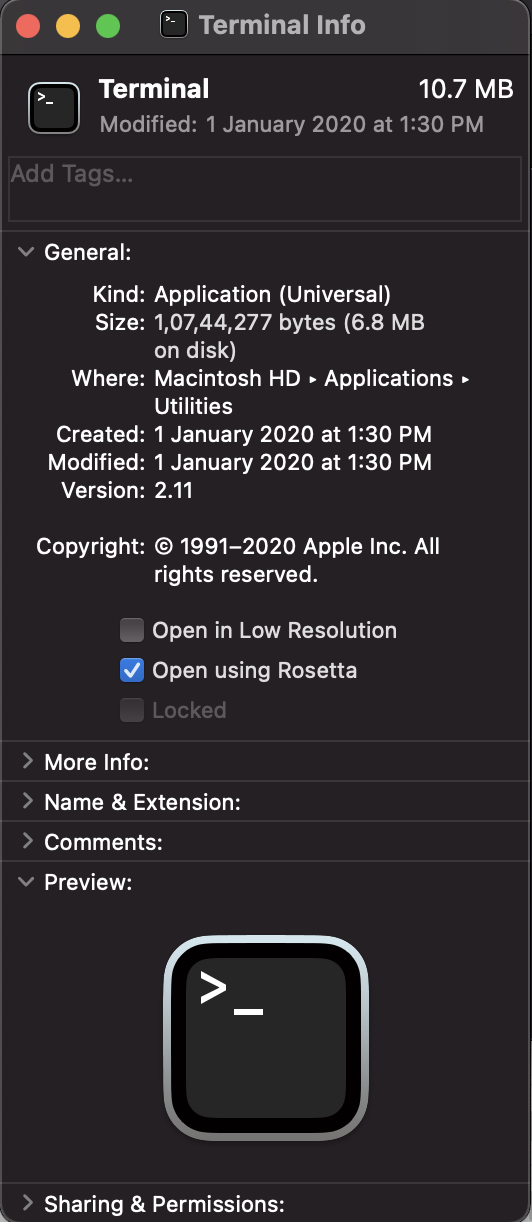
Source: My MacBook Pro
I have a fun fact about Rosetta at the end of the article for you. Let’s focus on getting our Python 3.6 environment working on the new MacBook.
Creating a Python 3.6 virtual environment
To achieve this, we’re going to use the Nix Package Manager. Without getting too much into it, Nix is a cross-platform package manager that utilizes a purely functional deployment model where software is installed into unique directories generated through cryptographic hashes.
Let’s follow the below steps.
1. Enable Rosetta
Install Rosetta by running the command given a few lines above.
2. Install Nix
This will install Nix on your Mac. The next step is to create an entry into your .zprofile— the environment configuration for your shell. This enables us to use nix via the shell.
sh <(curl -L nixos.org/nix/install) — darwin-use-unencrypted-nix-store-volume
3. Setup Nix for use with your shell
If you don’t already have a .zprofile in your home directory, use the touch command to create one. Make sure you’re in your home directory when doing this.
touch .zprofile
Then open it up and add this line to the file.
source ~/.nix-profile/etc/profile.d/nix.sh
Great, you should now be able to access nix from the shell. I’d recommend relaunching the terminal to ensure everything is A-OK!
4. Get a temporary Python 3.6 Shell with Nix
Launch the Nix Shell for the Python 3.6 with the following command.
nix-shell -p python36
This will create a Python 3.6 environment which you can use to install packages. One last step to go!
5. Configure the Python Interpreter in your IDE
Once you have installed the packages, the only thing left to do is point your IDE Python Interpreter to the one we created in the last step.
I use PyCharm, so I configured the python interpreter from the below steps.
PyCharm > Preferences > Project > Python Interpreter > Add New > Existing Environment
If you need additional help to configure a Python Interpreter for PyCharm, here’s the link to the docs.
For Visual Studio Code, check out this article.
Alright, that’s it for this article….Oh hold on, I promised you a fun fact about Rosetta earlier, didn’t I? Right…
Rosetta, I’ve heard this name before!
Apple has used the Rosetta name before. When it migrated the Mac from PowerPC processors to Intel chips, it used the same name to perform the same function — enabling PowerPC apps to run on Intel chips.
While the name and aim remain the same, there’s a big difference between the older Rosetta and the version we are using today because Apple has developed the target processor, which means it knew exactly what Rosetta needs to do.